Showing posts with label machine embroidery. Show all posts

Monday, 3 December 2018

November samples

2018/Week 44, Hairy Loch
The reeds in this loch above Leverburgh on Harris have always appealed to me. Out of context they look like fine scratch marks on metal.
Thinking machine stitch would be too clumsy, I hand stitched a little section on silvery satin fabric. Not quite the effect I'd have liked but as much as I had patience for!

18/45 White Line
Once you start looking, there's inspiration everywhere... this was a badly eroded white line at the side of the road.
I free machined a section on Lutradur 70 over black cotton fabric, using a fine white cotton thread (Madeira Tanne 50). Then I zapped it with a heat gun. The unstitched areas vanish altogether.
18/46 Map Lichen
The last of my Harris inspirations, though this lichen grows locally on Skye too. Rhizocarpon geographicum is called map lichen because it looks like a map in an atlas, or an aerial view of a patchwork of fields.
I free machined my piece on Solufleece, filling the areas with different colours and patterns without worrying about realism. Some are dense and solid, others open and lacy. The challenge as always is linking everything together so it remains whole when the Solufleece is dissolved away! Only stitched thread is left, no fabric at all in this piece.
18/47 Full Moon
Binoculars gave a wonderful view of the scars and craters on a spectacular full moon this week.
I embroidered a circle completely filled with little star patterns to resemble craters.
The thread was shaded pale grey, though that doesn't really show up in the photo. I was disappointed that the white guideline made with a fine SewLine pencil wouldn't quite go away... lesson learned.  

18/48 Crocheted Blanket
Just had to commemorate this... I finally finished the blanket I've been crocheting on and off for 18 months or so! I never meant to make a blanket, didn't need one, I just started playing with yarn left over from a couple of cushion covers. Then I liked the hexagons so much I just kept going, and, well, we haven't got a single bed in the house so it had to fit a double to be any use at all...

So here it is - 425 hexagons, each in six colours so that was 5100 yarn ends to darn in, groan. Pretty, though.

And here's my stitched sample based on the hexagonal motif.
Free machine embroidery on Solufleece, of course. I domed the "popcorn" stitches by stitching round and round. 

Look, no fabric!
 
Now, what to do with all those yarn ends? Of course I saved them, wouldn't you?!

Sunday, 9 September 2018

August Samples

18/31 Chain stitch on soluble fabric  (that's 2018, week 31 by the way!)
A technique geek one this time. Not many people seem to play with hand embroidery on dissolvable film, but I can't resist. It's quite challenging... try it and you'll see!

I worked rows of chain stitch in grey, blue and turquoise pearl cotton, adjacent but not linked. Then to hold them together I threaded pink-mauve through the straight stitches that appear on the back of the fabric when you stitch chains.
Carefully dissolved, and voila! A fabric made of chain stitch embroidery. So what if it'd be quicker to knit, this is something different. But which side is best? The back looks like this:
 
18/32 Pattern Stitch fabric
Still in the mood for creating "fabric" from just stitches on dissolvable film, this time I went with machine embroidery. But built-in, automatic embroidery patterns, not free machining.
 
Thinking of the sea (it's right in front of my desk!) I chose a curled, wavy pattern:
I stitched three layers of this pattern on Romeo, working from dark at the bottom to light at the top. By the third layer, the Bernina had sussed that I wasn't using its pretty patterns as intended and started protesting by breaking the thread, but I pushed it on - I am very cruel to that machine.
In the end it was quite successful. I deliberately (honest) didn't align the stitches of each row, but it's all stayed together well and the curly pattern shows in places.
   
18/33 Gannet eye
I love watching gannets diving for fish in the bay - they're so spectacular! They look amazing close up too...
 Solid free machining (sometimes called thread painting) on calico.
 
18/34 Hand embroidery in air
There's such a craze for "hoop art" at the moment - embroidery displayed in the hoop used to make it. So of course I have to try it with dissolvable fabric!    
 
I decided I'd need a solid fabric edge, as tying a lacy confection onto the hoop would be messy at best. So I hooped up some felt with my dissolvable film and made sure all the stitching was attached to that.
I used tiny circles of felt for the flower centres - you do need somewhere to fasten threads on and off! They're linked with green running stitch, knotted at the junctions. Then simple straight stitch for the flower petals and French knots for the centres.     
 
18/35 Felt jewellery
For a change, I followed an online course in Wool Felt Jewellery throughout August. It was great fun, I can highly recommend Fiona Duthie's courses
 
We learned all sorts of techniques to make wet felted beads, cords and lace. I especially loved the cords, and made several bangles. I haven't done a lot of felting, so there was a lot to learn; I made sure I tried everything while there was someone to consult - Fiona and other students were very helpful.
 
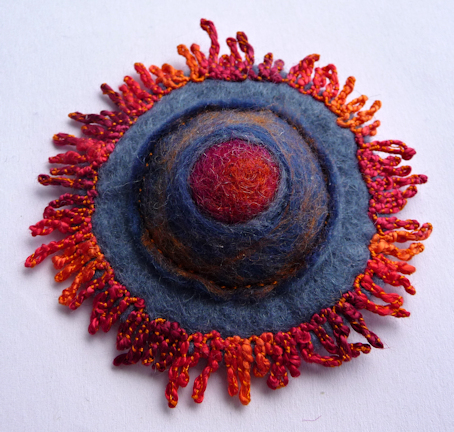
My final experiment was this brooch idea, combining the felt I'd made with a bit of free machining on dissolvable fabric.        
It's a felt bead trapped in flat felt as it was made, then revealed as an "inclusion". I cut out the circle, then stitched it onto a larger circle of felt that I'd edged with cable stitch worked on Solufleece.

I focussed so much on learning all the new techniques that I ran out of time for making finished pieces. But I still want to make myself a cord necklace, with slider beads and inclusions.

It was wonderful to find I could make small felt pieces at my desk without getting water everywhere. Now I know that I'll definitely do more wet felting to combine with my stitching.
  

Wednesday, 21 March 2018

March samples, part 1: ICE!

Here on Skye we escaped the snow that other parts of the UK suffered, but it was bitterly cold and windy. And, there was a fantastic bonus - natural ice sculptures!

Waterfalls froze solid. This is Eas a Bhadrain, just beside the main road between Broadford and Portree:
But best of all was Mealt Falls, up on the Trotternish peninsula. The water that normally drops straight off a steep cliff was blown back by the freezing wind, and coated the plants and fences with ice. A magical sight!


Not an easy subject to tackle in machine embroidery, but I did do a couple of little samples.

First grasses coated in ice, I loved how you could see the stem through the ice. I machine embroidered the stems on Lutradur 70 then cut round them by hand. Overlaying two layers gave depth.
I also had a go at a fence with ice covering every wire and dripping with icicles: FME on Aquasol with silver on the bobbin and shaded turquoise on top. I'm not trying to be realistic, I wanted a colour to contrast with a white background so I could also get shadows. Plus a bit of twinkle!  
I'm still wondering how to interpret some of the other phenomena... but I can't improve on nature, so maybe I'll just be happy with memories of a rare and beautiful sight.

Saturday, 10 March 2018

February samples

My latest weekly whatnots: stitching just for fun.

18/05 Hand embroidery on soluble fabric
Experimenting with some bright, lustrous (but also very slippery and springy) threads I was given. On a network of green FME and felt dots I hand stitched simple flowers using straight stitch, French knots and buttonhole. It was hard work! No hiding places for all the ends, and tough getting the thick thread through the centre repeatedly. Shows potential though?   

18/06 Heart
Well it was mid February... what else could I do? Bright yarns, trapped in a sandwich of soluble fabrics, machine embroidered freely and with some built-in patterns. Finished with a few French knots in shaded pearl cotton thread before dissolving.


18/07 Log pile
A pile of logs sits drying in our garden, and I love the pattern they make. But I didn't fancy stitching in woody colours. So, I created spirals of space dyed wool yarn (Colinette, I think) embellished onto a base of indigo dyed wool.  The wool was actually an old blanket - I hot-washed it to shrink/felt it then dyed in an indigo vat (not specially for this sample, I hasten to add). Then free machined lines in indigo rayon 30 Alcazar thread.

18/08 Snowdrops
Flower of the month. I've embroidered snowdrops before, and wanted to do something a bit different. So I focused on a close up view of open flowers, so you can see the beautiful centres. I made a lacy design of linked motifs, ending up with no visible fabric.
The flowers were free machined on Lutradur 30 then burned out with a soldering iron. Finally I hand stitched bullion knot stamens with a single strand of yellow cotton.   


Wednesday, 10 January 2018

Limpets part 4: two dimensions

I’m looking at limpet shells as flat shapes now – from above or from the side, simple and stylised. NOT realistic portraits!


From the side, they’re rounded triangles. From above, you see round-ish shapes sometimes patterned with spokes that don’t quite go to the centre. Strongly ribbed shells appear to stick out beyond the “circle” and make it seem more polygonal.

So it’s circles, triangles and spokes/ribs as starting points– and no need to make anything resembling actual shells!

Straight stitch on Somerset paper – punched a few holes as centres, Oliver Twists space dyed fine cotton.


Buttonhole wheels – space dyed linen thread on a scrap of Harris tweed.

Ribbed spiders web – pearl cotton 8 on denim. Love the effect of gently shaded thread here; note to self – worth drawing a circle on the back to get spokes evenly sized, or else odd ones will be left sticking out of the weaving.  


Straight stitch on hand dyed muslin (backed with felt). Seemed to need French knot centres; never mind whether they look more like flowers than limpets, the shells are just a starting point. Space dyed machine embroidery cotton from Oliver Twists.


Machine embroidery with Flower Stitch attachment.

Using a built-in pattern like a blanket stitch effect (720 on my Artista), with width reduced to 1. Photo shows the stitch worked straight, and then one round with the Flower Stitcher. Then I did lots of rounds reducing the diameter slightly each time, ending up by moving the needle across 2 or 3 steps to get as closer to the centre as possible. The first sample used purple top and bottom. Then I went for a subtler effect using yellow bobbin thread to match fabric – the top tension is a little high so it gets pulled up and makes the purple stitching appear less solid.
That inspired me to try metallic thread on the bobbin… with turquoise thread on navy felt, I got just a hint of sparkle coming through. Sorry, these are only 2cm across and I haven't managed to photograph them very well.    

Free machine embroidery cone patterns.


This is me doodling freehand on hand dyed cotton backed with pelmet Vilene. I tried using ribbed cone shapes to make patterns, always aiming to cut the thread as little as possible - which with these shapes means stitching forward and back along the same lines, so it’s not as delicate as you could be with hand embroidery.


My favourites above were the open, base-less ones, so I did a few more with shaded blue thread on navy felt. OK, they look more like floating seeds than shells, but they’re stylised, right?!

The “plan view”, limpets seen from above, still has more potential for 2D patterns I think.  This next one’s machine stitched freehand (no guidelines, eek!) on hand dyed cotton. 

With no backing (I used a hoop), the bobbin thread comes through and shows as tiny dots. What makes it interesting is using a shaded thread on both spool and bobbin, so the colour comes and goes giving a less solid effect.

A bit of Embellisher play next. 

Not much resemblance to limpet shells perhaps, but they’re still the inspiration. I embellished rings of wool yarn onto the back of hand dyed linen, then free machined on top with light grey and a darker bobbin thread to break up the stitched lines a bit.

And at last, my real fave – soluble fabricOverlapping limpet circles in three colours to start with. A bit of zigzag round the edge, plus careful pinning out to dry, helps them stay vaguely circular.

And these just touch rather than overlapping. I worked the outlines and ribs in very pale gold coloured (not metallic) thread first, then filled in and edged with off-white. Might’ve been better left more open and lacy? 

And that’s where I’m going to leave the limpet theme for now. There’s a few things I haven’t tried, like burning synthetics, layering, scaling up… but I’ve got other things I want to do now.  

Saturday, 23 December 2017

Limpets part 3 - more 3D forms

As promised, I’ve gone on to make limpet-inspired 3D… objects… made in the round instead of flat then seamed.
 
So it’s straight into free machining. If you machine stitch madly, round and round in a not-quite circular pattern, a flexible fabric should distort into a 3D cone.  
Yes! Well, not too bad… this first one’s rust felt, just free machined round and round from the centre in shaded rayon 30 Alcazar thread, then cut out.
And here’s a colony of them, domed FME on creamy felt. I like the extra colour-mixing of the coloured bobbin thread coming through, the bands would be too solid otherwise. Hmm, this is one to come back to…

So, how about the same method on dissolvable fabric? I give you – limpets made entirely of thread! It’s domed FME (as above) worked on Solufleece. I tried it first in a hoop, but couldn’t get a steep cone – that’s the big shallow one. Holding the fabric without a hoop worked better, but ouch, it’s tough on the fingers holding so tight. I used shiny off-white rayon 30 threads.
I really like these limpets, but they’re quite hard work - the stitching needs to be dense, to get the doming effect and to link the stitches without any structural support, so they turn out very stiff and difficult to decorate.

I also had a quick go at hand stitching 3D limpet cones – by partially gathering circles as you would for shibori. Trickier than it looks, and not a lot of fun.


Finally, I thought I’d try a couple of techniques from Jean Draper’s book, “Stitch and Structure”.

Coiling. Here I tried wrapping and coiling a cord to form  a shell shape. It’s sort of like making a coiled clay pot – only slower and trickier, IMHO. I used thick nylon cord and Coats Anchor multicolour pearl cotton thread. Quite tough on the fingers, and difficult to deal with the cord ends at the start and finish even after I melted/sealed them with a soldering iron. But the result’s quite cute… as long as you don’t look inside 😉


Buttonhole stitch - worked round and round a real limpet shell, starting at the top and increasing to match its shape (so why did it end up so steep?), in Crofter DK knitting yarn. A stiffer yarn might give a better result, but would be harder to stitch.


What else could I do? Well it’d be easy to crochet a cone, but not very interesting… knitting likewise. Felting might work, especially at a large scale… bigger forms generally might be worth exploring, as vessels perhaps.

But for now I’m moving on. Next time – surface designs or patterns inspired by multiple limpet shells.