
Sunday, 24 December 2017
Saturday, 23 December 2017
Limpets part 3 - more 3D forms
As promised, I’ve gone on to make limpet-inspired 3D…
objects… made in the round instead of flat then seamed.
 Yes! Well, not too bad… this first one’s rust felt,
just free machined round and round from the centre in shaded rayon 30 Alcazar
thread, then cut out.
Yes! Well, not too bad… this first one’s rust felt,
just free machined round and round from the centre in shaded rayon 30 Alcazar
thread, then cut out.

So, how about the same method on dissolvable fabric? I give you – limpets made entirely of thread! It’s domed FME (as above) worked on Solufleece. I tried it first in a hoop, but couldn’t get a steep cone – that’s the big shallow one. Holding the fabric without a hoop worked better, but ouch, it’s tough on the fingers holding so tight. I used shiny off-white rayon 30 threads.
 I really like these limpets, but they’re quite hard work
- the stitching needs to be dense, to get the doming effect and to link the
stitches without any structural support, so they turn out very stiff and
difficult to decorate.
I really like these limpets, but they’re quite hard work
- the stitching needs to be dense, to get the doming effect and to link the
stitches without any structural support, so they turn out very stiff and
difficult to decorate.

I also had a quick go at hand stitching 3D limpet cones – by partially gathering circles as you would for shibori. Trickier than it looks, and not a lot of fun.


So it’s straight into free machining. If you machine
stitch madly, round and round in a not-quite circular pattern, a flexible
fabric should distort into a 3D cone.

And here’s a colony of them, domed FME on creamy felt. I like the extra colour-mixing of the coloured bobbin thread coming through, the bands would be too solid otherwise. Hmm, this is one to come back to…

So, how about the same method on dissolvable fabric? I give you – limpets made entirely of thread! It’s domed FME (as above) worked on Solufleece. I tried it first in a hoop, but couldn’t get a steep cone – that’s the big shallow one. Holding the fabric without a hoop worked better, but ouch, it’s tough on the fingers holding so tight. I used shiny off-white rayon 30 threads.


I also had a quick go at hand stitching 3D limpet cones – by partially gathering circles as you would for shibori. Trickier than it looks, and not a lot of fun.


Finally, I thought I’d try a couple of techniques from
Jean Draper’s book, “Stitch and Structure”.
Coiling. Here
I tried wrapping and coiling a cord to form
a shell shape. It’s sort of like making a coiled clay pot – only slower
and trickier, IMHO. I used thick nylon cord and Coats Anchor multicolour pearl
cotton thread. Quite tough on the fingers, and difficult to deal with the cord
ends at the start and finish even after I melted/sealed them with a soldering
iron. But the result’s quite cute… as long as you don’t look inside 😉

Buttonhole stitch - worked round and round a real
limpet shell, starting at the top and increasing to match its shape (so why did it end up so steep?), in Crofter
DK knitting yarn. A stiffer yarn might give a better result, but would be
harder to stitch.

What else could I do? Well it’d be easy to crochet a
cone, but not very interesting… knitting likewise. Felting might work,
especially at a large scale… bigger forms generally might be worth exploring,
as vessels perhaps.
But for now I’m moving on. Next time – surface designs or
patterns inspired by multiple limpet shells.
Friday, 22 December 2017
Humbug!
Christmas... a time to brighten up the darkest days of winter with twinkly lights and thoughtful gifts, sumptuous feasts and cards to old friends.
But sometimes it all gets a bit too much... commercialisation, pressure, hard work, waste... Around now I tend to have a "bah, humbug!" phase.
So here's a little seasonal offering - my own design for a crocheted humbug. Make alternative (tongue in cheek?) decorations, or something to fling at grumpy people. Perhaps taking a break to create a silly humbug will bring back the simple childish pleasure, help you keep sane... or make a point to those around you.
Most importantly - have fun!

Alternative Christmas decoration!
But sometimes it all gets a bit too much... commercialisation, pressure, hard work, waste... Around now I tend to have a "bah, humbug!" phase.
So here's a little seasonal offering - my own design for a crocheted humbug. Make alternative (tongue in cheek?) decorations, or something to fling at grumpy people. Perhaps taking a break to create a silly humbug will bring back the simple childish pleasure, help you keep sane... or make a point to those around you.
Most importantly - have fun!
Crochet Humbug
designed by Anne Honeyman, aka chocolatefrog, www.annehoneyman.co.uk
Alternative Christmas decoration!
- hang on the tree
- free standing ornament
- or make a whole garland
Other ideas:
- bean bags (for catch or juggling)
- keyring or bag charm
- Earrings
Small quantities of white and black yarn, thickness
depending on size of humbug, and a crochet hook to match:
Mini, e.g. for garlands or keyrings (about 4cm): no. 10
crochet cotton, 1.5 hook
Medium, e.g. for tree decoration (about 5-6cm): 4ply
cotton, 2.5 hook
Large, e.g. for free standing ornament or bean bag (about
9cm): D.K. or Aran wool, 4.0 hook
You will also need a little toy stuffing.
Abbreviations
ch = chain ss = slip st dc = double crochet
ch = chain ss = slip st dc = double crochet
To make
Using white, work 15 ch
Using white, work 15 ch
Round 1
Skip 1st ch, 1 dc in next 13 ch, 3 dc in last ch. Now work back along the bottom loops of the foundation ch: 1 dc in next 12 ch, 2 dc in final ch (30 dc). Ss in 1st dc to join.
Skip 1st ch, 1 dc in next 13 ch, 3 dc in last ch. Now work back along the bottom loops of the foundation ch: 1 dc in next 12 ch, 2 dc in final ch (30 dc). Ss in 1st dc to join.
Round 2
1ch, 1dc in each dc, ss in 1st dc to join.
1ch, 1dc in each dc, ss in 1st dc to join.
Rounds 3 and 4
As Round 2
As Round 2
Rounds 5 and 6
Change to black, work as round 2
Change to black, work as round 2
Rounds 7 to 10
White, as round 2
White, as round 2
Repeat rounds 5 to 10 once more, so you have 3 wide white
bands separated by two narrow black bands.
Fasten off leaving
long tail for sewing up.
To complete
You will now have a little square pouch. Put a pin in the top edge at each side/fold. Bring the pins together to make the humbug shape. Stitch closed in this shape, stuffing carefully before closing the gap completely. Add a hanging loop if you want, perhaps a length of crochet chain.
You will now have a little square pouch. Put a pin in the top edge at each side/fold. Bring the pins together to make the humbug shape. Stitch closed in this shape, stuffing carefully before closing the gap completely. Add a hanging loop if you want, perhaps a length of crochet chain.
Wednesday, 6 December 2017
Limpets part 2

I thought about adding decorative bands or toppings, but…
well, they wouldn’t be integrated in any way, just superficial. And there’s so
little space, not much scope anyway. So, no. Even I draw the line at making
limpet party hats!

Starting by exploring the surface texture, I covered a
shell with aluminium foil, smoothing it well into the ridged pattern. Black
acrylic paint was worked into all the texture and then rubbed off so it just
remained in the crevices. Not textile, but quite effective.

Next, to investigate the shape, I covered a limpet with
soluble paper, wetting it to make a pulp I could press into the texture. When
dry I cut and peeled it off, and turned it inside out to see the textured side.
A rubbing of Goldfinger paste brought out the pattern.

Limpet shells aren’t round – they’re wonky cones. Now
I’ve got a useful template, so let’s move on from using actual shells to
recreating them. Well, not necessarily ones that’d blend in on the sea shore –
I want to have fun with the basic cone shape in different colours and patterns.
Sticking with paper for a while… simple hand embroidery plus needle perforations on Somerset paper.

… and then I liked the perforation effect so much I
did some more on dyed and waxed paper (the things you hoard from City &
Guild days!). I ran the unthreaded Bernina around it, scratched lines with a
needle, and used a Japanese screw punch. The waxing emphasises the marks, going
pale around holes.


OK, bring on the Bernina! At last… back to free
machining. Fine Lutradur (30) in a hoop, embroidered with subtle bands of
off-white straight and zigzag/satin stitch. I used a soldering iron to burn out
the shapes and seal the edges before hand stitching the seams to make them 3D.
I love that the fabric is almost invisible, and the shells are so
delicate.


But now I’ve thought of the heat gun… A quick one
with random green and orange FME on green Kunin felt, zapped to make it lacy
then seamed to make a cone.

Right, enough construction – for my next trick, it’s 3D
limpet (-ish things!) without seams. Hopefully…
Saturday, 14 October 2017
Limpets

Right in front of my studio there’s a ready supply of
limpet shells, and I’m always wondering what I could do with them.

I’d seen Alice
Fox’s stitched limpets – she takes ones
with the top of the cone broken off, drills holes around the aperture, and “patches”
the gap with flat needle weaving in off-white thread.
Intriguing… so I drilled one of my own and had a go. To
make it different I added colour and texture - shaded indigo linen thread (from
Stef Francis) and ribbed spider’s web stitch. If you’re going to try it,
remember you’ll need an odd number of spokes for simple weaving, but an even
number for ribbed spider’s web.

I wasn’t all that keen on drilling though… it seems, I
don’t know, unnatural? A strange thing to say when I’m adding stitch to limpet
shells, but that’s how it feels to me. Also it’s not a technique you could just
play with spontaneously on holiday, say. So what could I do with these holey
shells without the need to damage them further?
They could be completely wrapped with thread, ribbon or
fabric. But I’d rather see some of the original shell. So let’s try just enough
to make a base to decorate.


This next one was wrapped through the hole as before, but with a natural
pearl cotton to tone in with the shell. Then I stitched raised chain band on these bars, using no. 8 pearl cotton (Hellebore, House of Embroidery).
There’s nowhere to get rid of the ends on this one so I made a “feature” of
them – i.e. just tied them in a knot on the front! I suppose if this was going
to hang as a pendant or something these ends could form the loop. I just love raised
chain band, any excuse. I might try this again with more bars, more rows of
stitching – if I can find just the right shell.

These could make hanging ornaments, maybe a few strung
together vertically or along a string as a garland? I can imagine trying that
on a wet day by the seaside…
The tricky bit is fastening the thread on and off. I knotted the ends inside and threaded the ends through a few of the “stitches”, but tacky glue or masking tape would do – I won’t tell if you don’t. 😉 Best to allow plenty of thread to minimise the problem, no extra fastening on and off and hiding thread ends. Or make a feature of knots/tails on the front, or use as a loop for hanging.
Another approach is to fill the hole, with texture or
protrusions.

French knots embroidered on felt
with variegated pearl cotton, made to fill the shell’s hole.

Loops of pearl cotton 8 (Hellebore
again), on purple hand dyed felt, glued inside the holey shell with Tacky Glue.
I left them uncut but a denser cut pile is another option.

A fringe free machined on soluble fabric with variegated
pastel thread. I worked it round a small circle of white felt and after
dissolving I stuffed it in the limpet ring and held it in place with glue
inside.

Beaded tentacles or stalks made entirely
by free machine embroidery on soluble fabric with a deep red velvet centre.
Finally I moved on to stitching limpet rings onto fabric.

It
was soon apparent that I needed a firm base or it would distort. So I used
thick wool (an old blanket I felted and indigo dyed) backed with pelmet Vilene.
I stitched three rings down, just big “spokes” all round from the outside to
the inside. Then I covered them by weaving round and round in ribbed spiders
web (as A) using subtly variegated linen threads (from a long defunct
supplier). To integrate these into the background I added a couple of lines of
running stitch with light indigo pearl cotton.
I’m
pleased with these, the embroidery seems to suit them, it’s quite natural and
shell-like.
So, that was fun, and maybe some of the ideas can be
taken forward… but it’s all broken shells, surely I can do something with
intact ones? Without resorting to drilling holes, or gluing things to the
surface. Watch this space…
Friday, 2 June 2017
Starfish
I live on the sea shore now! After 10 months that's still so novel and exciting.

One of the marine themes I've been exploring, on and off, is starfish. Such a variety of shapes, colours and patterns, who could resist?

I started with a favourite technique - FME on soluble to make lacy shapes. These cast pretty shadows if they're mounted on pins and lit at an angle.

I was a bit disappointed with these tbh. Not sure why... too far from the original inspiration, and not interesting enough in ordinary daylight? And, I remembered I meant to give up creating fragile wall pieces that need box frames and are impossible to photograph! So I didn't take them any further. They're just pinned randomly on polystyrene here.
So, going off at a tangent, I tried felted crochet next. A nice loosely spun pure wool, in pink-orange-red. I tried raised, textural crochet stitches, and plain crochet with chunky French knots. After felting in the washer they looked like this:

The really knobbly one, using popcorn stitch, is fun - it's very 3D. And the French knots worked well too. Now what? These are quite big (9-12cm), but perhaps smaller ones, made with finer wool, would make brooches?
Back to the Bernina, and soluble fabric (I never stay away long!). But not lacy embroidery this time - the soluble fabric allowed me to decorate a cut out felt sunstar. Embroidering felt this way means you can go over the edges, and end up with a slightly stiffened shape without the usual fluffy edges. It's only about 6cm, so don't zoom in. More brooch potential, I thought...

A wildlife trust walk at an exceptionally low tide provided my first glimpse of living maerl beds. Maerl is coralline red algae, a sort of seaweed with a hard chalky skeleton that grows unattached on the sea bed. It provides shelter for a wide range of marine creatures, including brittle stars.

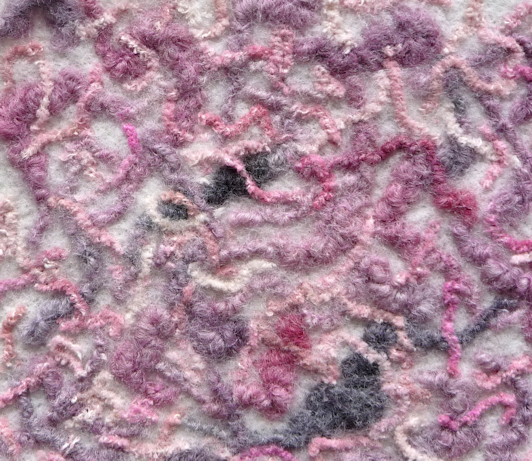
I used the embellisher to create my maerl bed, needle felting lengths of pink-purple textural yarns to white felt.

Then I machine embroidered brittle stars on soluble fabric.

The brittle stars were fun, so I made a whole tangle of them for another little framed piece:

That led to the idea of a lacy structure of finer brittle stars held together by crossed legs!

Instead of mounting in a frame, maybe something like this could hang in a window?

Aargh, there I go again, creating things that are impossible to photograph nicely! (for me, anyway)
And finally (for now), I tried a brittle star bowl. Just a little one, 7cm diameter. The most open bowl I've ever made, and a very different technique to my Botanic, Ice and Metamorphic designs. Amazingly, it worked!

The idea needs some refining, and I didn't like the brittle star centres, but it's opened up a world of new possibilities... watch this space!

One of the marine themes I've been exploring, on and off, is starfish. Such a variety of shapes, colours and patterns, who could resist?

I started with a favourite technique - FME on soluble to make lacy shapes. These cast pretty shadows if they're mounted on pins and lit at an angle.

I was a bit disappointed with these tbh. Not sure why... too far from the original inspiration, and not interesting enough in ordinary daylight? And, I remembered I meant to give up creating fragile wall pieces that need box frames and are impossible to photograph! So I didn't take them any further. They're just pinned randomly on polystyrene here.
So, going off at a tangent, I tried felted crochet next. A nice loosely spun pure wool, in pink-orange-red. I tried raised, textural crochet stitches, and plain crochet with chunky French knots. After felting in the washer they looked like this:

The really knobbly one, using popcorn stitch, is fun - it's very 3D. And the French knots worked well too. Now what? These are quite big (9-12cm), but perhaps smaller ones, made with finer wool, would make brooches?
Back to the Bernina, and soluble fabric (I never stay away long!). But not lacy embroidery this time - the soluble fabric allowed me to decorate a cut out felt sunstar. Embroidering felt this way means you can go over the edges, and end up with a slightly stiffened shape without the usual fluffy edges. It's only about 6cm, so don't zoom in. More brooch potential, I thought...

A wildlife trust walk at an exceptionally low tide provided my first glimpse of living maerl beds. Maerl is coralline red algae, a sort of seaweed with a hard chalky skeleton that grows unattached on the sea bed. It provides shelter for a wide range of marine creatures, including brittle stars.

I used the embellisher to create my maerl bed, needle felting lengths of pink-purple textural yarns to white felt.
Then I machine embroidered brittle stars on soluble fabric.

The brittle stars were fun, so I made a whole tangle of them for another little framed piece:

That led to the idea of a lacy structure of finer brittle stars held together by crossed legs!

Instead of mounting in a frame, maybe something like this could hang in a window?

Aargh, there I go again, creating things that are impossible to photograph nicely! (for me, anyway)
And finally (for now), I tried a brittle star bowl. Just a little one, 7cm diameter. The most open bowl I've ever made, and a very different technique to my Botanic, Ice and Metamorphic designs. Amazingly, it worked!

The idea needs some refining, and I didn't like the brittle star centres, but it's opened up a world of new possibilities... watch this space!
Sunday, 1 January 2017
Samples 2016: 52, Grid/Sunset

Last sample of the year – I just have to play with
soluble fabric again! I machined a grid of shaded orange on Solufleece. Then I
filled it with raised chain band and running stitch/weaving using stranded
cottons in shades of orange, yellow, pink and mauve.
I love how the raised chain band looks like little hearts
when the fabric’s disappeared.
So that’s it – TEN YEARS of weekly samples completed,
with a different theme each year. I
think it’s time I gave it a rest. I’ve tried before, but soon missed the
project too much. I’m going to try harder this time, but who knows... Just as everyone else seems to be getting involved in weekly exercises, I'm stopping - ahead of my time, or just plain awkward?!
Subscribe to:
Posts (Atom)